Python Cookbook中文版电子书下载
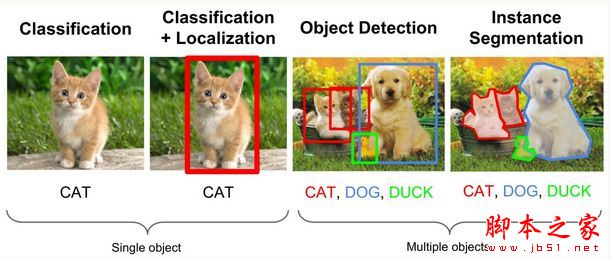
什么是目标检测
目标检测关注图像中特定的物体目标,需要同时解决解决定位(localization) + 识别(Recognition)。相比分类,检测给出的是对图片前景和背景的理解,我们需要从背景中分离出感兴趣的目标,并确定这一目标的描述(类别和位置),因此检测模型的输出是一个列表,列表的每一项使用一个数组给出检出目标的类别和位置(常用矩形检测框的坐标表示)。
通俗的说,Object Detection的目的是在目标图中将目标用一个框框出来,并且识别出这个框中的是啥,而且最好的话是能够将图片的所有物体都框出来。
目标检测算法
目前目标检测领域的深度学习方法主要分为两类:两阶段(Two Stages)的目标检测算法;一阶段(One Stage)目标检测算法。
Two Stages
首先由算法(algorithm)生成一系列作为样本的候选框,再通过卷积神经网络进行样本(Sample)分类。也称为基于候选区域(Region Proposal)的算法。常见的算法有R-CNN、Fast R-CNN、Faster R-CNN等等。
One Stage
不需要产生候选框,直接将目标框定位的问题转化为回归(Regression)问题处理,也称为基于端到端(End-to-End)的算法。常见的算法有YOLO、SSD等等。
python实现
本文主要讲述如何实现目标检测,至于背后的原理不过多赘述,可以去看相关的论文。
ImageAI是一个简单易用的计算机视觉Python库,使得开发者可以轻松的将最新的最先进的人工智能功能整合进他们的应用。
ImageAI本着简洁的原则,支持最先进的机器学习算法,用于图像预测,自定义图像预测,物体检测,视频检测,视频对象跟踪和图像预测训练。
依赖
•Python 3.5.1(及更高版本)
•pip3
•Tensorflow 1.4.0(及更高版本)
•Numpy 1.13.1(及更高版本)
•SciPy 0.19.1(及更高版本)
•OpenCV
•pillow
•Matplotlib
•h5py
•Keras 2.x
安装
•命令行安装
pip3 install https://github.com/OlafenwaMoses/ImageAI/releases/download/2.0.1/imageai-2.0.1-py3-none-any.whl
•下载imageai-2.1.0-py3-none-any.whl 安装文件并在命令行中指定安装文件的路径
pip3 install .\imageai-2.1.0-py3-none-any.whl
使用
Image支持的深度学习的算法有RetinaNet,YOLOv3,TinyYoLOv3。ImageAI已经在COCO数据集上预先训练好了对应的三个模型,根据需要可以选择不同的模型。可以通过下面的链接进行下载使用:
•Download RetinaNet Model - resnet50_coco_best_v2.0.1.h5
•Download YOLOv3 Model - yolo.h5
•Download TinyYOLOv3 Model - yolo-tiny.h5
以上模型可以检测并识别以下80种不同的目标:
person, bicycle, car, motorcycle, airplane,
bus, train, truck, boat, traffic light, fire hydrant, stop_sign,
parking meter, bench, bird, cat, dog, horse, sheep, cow,
elephant, bear, zebra, giraffe, backpack, umbrella,
handbag, tie, suitcase, frisbee, skis, snowboard,
sports ball, kite, baseball bat, baseball glove, skateboard,
surfboard, tennis racket, bottle, wine glass, cup, fork, knife,
spoon, bowl, banana, apple, sandwich, orange, broccoli, carrot,
hot dog, pizza, donot, cake, chair, couch, potted plant, bed,
dining table, toilet, tv, laptop, mouse, remote, keyboard,
cell phone, microwave, oven, toaster, sink, refrigerator,
book, clock, vase, scissors, teddy bear, hair dryer,
toothbrush
先来看看完整的代码,使用YOLOv3算法对13张照片进行目标识别。
from imageai.Detection import ObjectDetection
import os

detector = ObjectDetection()
detector.setModelTypeAsYOLOv3()
detector.setModelPath("./model/yolo.h5")
detector.loadModel()

path = os.getcwd()
input_image_list = os.listdir(path+"\pic\input")
input_image_list = sorted(input_image_list, key = lambda i:len(i),reverse = False)
size = len(input_image_list)
for i in range(size):
 input_image_path = os.path.join(path+"\pic\input", input_image_list[i])
 output_image_path = os.path.join(path+"\pic\output", input_image_list[i])
 detections, extract_detected_objects = detector.detectObjectsFromImage(input_image=input_image_path,
             output_image_path=output_image_path,
             extract_detected_objects=True)
 print('------------------- %d -------------------' % int(i + 1))
 for eachObject in detections:
  print(eachObject["name"], " : ", eachObject["percentage_probability"], " : ", eachObject["box_points"])
 print('------------------- %d -------------------' % int(i + 1))
首先第一行导入ImageAI Object Detection类,在第二行导入os库。
然后创建了ObjectDetection类的新实例,接着就可以选择要使用的算法。分别有以下三个函数:
.setModelTypeAsRetinaNet()
.setModelTypeAsYOLOv3()
.setModelTypeAsTinyYOLOv3()
选择好算法之后就要设置模型文件路径,这里给出的路径必须要和选择的算法一样。
.setModelPath()
- 参数path(必须):模型文件的路径
载入模型。
.loadModel()
- 参数detection_speed(可选):最多可以减少80%的时间,单身会导致精确度的下降。可选的值有: “normal”, “fast”, “faster”, “fastest” 和 “flash”。默认值是 “normal”。
通过os库的函数得到输入输出文件的路径等,这不是本文重点,跳过不表。
开始对图像进行目标检测。
.detectObjectsFromImage()
- 参数input_image(必须):待检测图像的路径
- 参数output_image(必须):输出图像的路径
- 参数parameter minimum_percentage_probability(可选):能接受的最低预测概率。默认值是50%。
- 参数display_percentage_probability(可选):是否展示预测的概率。默认值是True。
- 参数display_object_name(可选):是否展示识别物品的名称。默认值是True。
- 参数extract_detected_objects(可选):是否将识别出的物品图片保存。默认是False。
返回值根据不同的参数也有不同,但都会返回一个an array of dictionaries。字典包括以下几个属性:
* name (string)
* percentage_probability (float)
* box_points (tuple of x1,y1,x2 and y2 coordinates)
前面说过可以识别80种目标,在这里也可以选择只识别自己想要的目标。
custom = detector.CustomObjects(person=True, dog=True)

detections = detector.detectCustomObjectsFromImage( custom_objects=custom, input_image=os.path.join(execution_path , "image3.jpg"), output_image_path=os.path.join(execution_path , "image3new-custom.jpg"), minimum_percentage_probability=30)
首先用定义自己想要的目标,其余的目标会被设置为False。然后配合.detectCustomObjectsFromImage()进行目标检测。
主要的代码基本如上所述,接下来看结果。先看看图片中只有一个目标的效果。
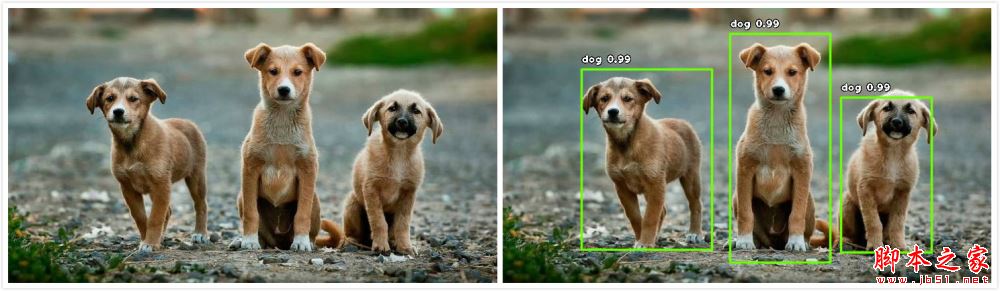
------------------- 10 -------------------
dog : 98.83476495742798 : (117, 91, 311, 360)
dog : 99.24255609512329 : (503, 133, 638, 364)
dog : 99.274742603302 : (338, 38, 487, 379)
------------------- 10 -------------------
效果还是不错的。再看看如果图片中有多个目标识别的结果如何。

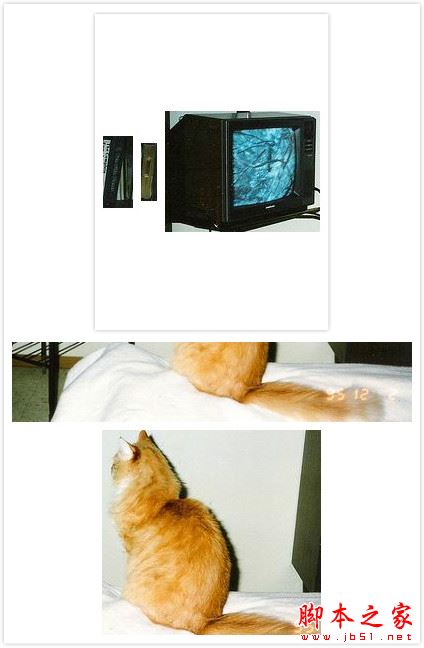
------------------- 4 -------------------
book : 55.76887130737305 : (455, 74, 487, 146)
book : 82.22097754478455 : (466, 11, 482, 69)
tv : 99.34800863265991 : (25, 40, 182, 161)
bed : 88.7190580368042 : (60, 264, 500, 352)
cat : 99.54025745391846 : (214, 125, 433, 332)
------------------- 4 -------------------
识别度还是很高的,背后人眼都看不清的书本都能被识别。
附录
GitHub:https://github.com/Professorchen/Computer-Vision/tree/master/object-detection
总结
以上所述是小编给大家介绍的利用ImageAI库只需几行python代码超简实现目标检测,希望对大家有所帮助,如果大家有任何疑问请给我留言,小编会及时回复大家的。在此也非常感谢大家对谷谷点程序网站的支持!
如果你觉得本文对你有帮助,欢迎转载,烦请注明出处,谢谢!
转载请注明:谷谷点程序 » 利用ImageAI库只需几行python代码实现目标检测