
书单推荐:成为Java顶级程序员架构师 ,这20来本(高薪)必看点击获取
对应的四种数据库表关系中存在四种关系:一对多,多对应,一对一,多对多。在前文中已经实现了xml配置方式实现表关系的查询,本文记录一下Mybatis怎么通过注解实现多表的查询,算是一个知识的补充。
同样的先介绍一下Demo的情况:存在两个实体类用户类和账户类,用户类可能存在多个账户,即一对多的表关系。每个账户只能属于一个用户,即一对一或者多对一关系。我们最后实现两个方法,第一个实现查询所有用户信息并同时查询出每个用户的账户信息,第二个实现查询所有的账户信息并且同时查询出其所属的用户信息。
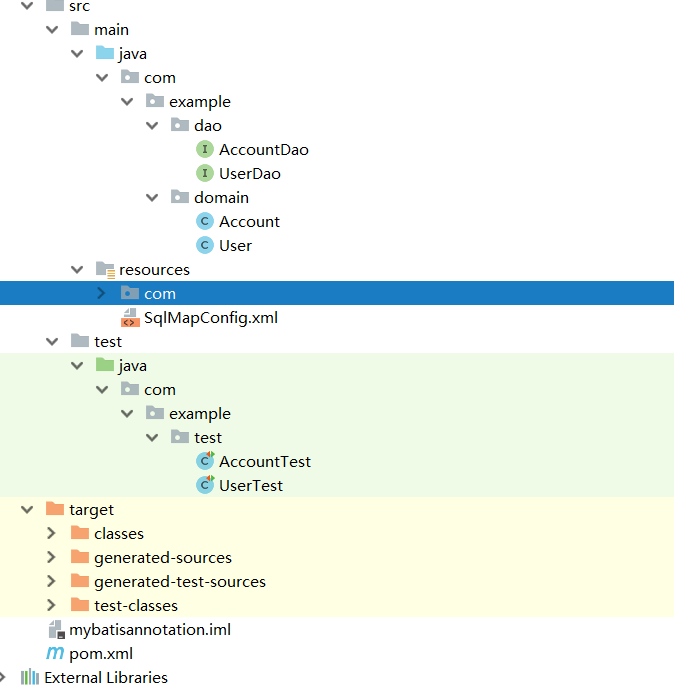
1.项目结构
2.领域类
public class Account implements Serializable{
  private Integer id;
  private Integer uid;
  private double money;
  private User user; //加入所属用户的属性
  省略get 和set 方法.............................
}
public class User implements Serializable{
  private Integer userId;
  private String userName;
  private Date userBirthday;
  private String userSex;
  private String userAddress;
  private List<Account> accounts;
  省略get 和set 方法.............................
}
在User中因为一个用户有多个账户所以添加Account的列表,在Account中因为一个账户只能属于一个User,所以添加User的对象。
3.Dao层
public interface AccountDao {
  /**
   *查询所有账户并同时查询出所属账户信息
   */
  @Select("select * from account")
  @Results(id = "accountMap",value = {
      @Result(id = true,property = "id",column = "id"),
      @Result(property = "uid",column = "uid"),
      @Result(property = "money",column = "money"),
      //配置用户查询的方式 column代表的传入的字段,一对一查询用one select 代表使用的方法的全限定名, fetchType表示查询的方式为立即加载还是懒加载
      @Result(property = "user",column = "uid",one = @One(select = "com.example.dao.UserDao.findById",fetchType = FetchType.EAGER))
  })
  List<Account> findAll();
  /**
   * 根据用户ID查询所有账户
   * @param id
   * @return
   */
  @Select("select * from account where uid = #{id}")
  List<Account> findAccountByUid(Integer id);
}
public interface UserDao {
  /**
   * 查找所有用户
   * @return
   */
  @Select("select * from User")
  @Results(id = "userMap",value = {@Result(id = true,column = "id",property = "userId"),
      @Result(column = "username",property = "userName"),
      @Result(column = "birthday",property = "userBirthday"),
      @Result(column = "sex",property = "userSex"),
      @Result(column = "address",property = "userAddress"),
      @Result(column = "id",property = "accounts",many = @Many(select = "com.example.dao.AccountDao.findAccountByUid",fetchType = FetchType.LAZY))
  })
  List<User> findAll();
  /**
   * 保存用户
   * @param user
   */
  @Insert("insert into user(username,birthday,sex,address) values(#{username},#{birthday},#{sex},#{address})")
  void saveUser(User user);
  /**
   * 更新用户
   * @param user
   */
  @Update("update user set username=#{username},birthday=#{birthday},sex=#{sex},address=#{address} where id=#{id}")
  void updateUser(User user);
  /**
   * 删除用户
   * @param id
   */
  @Delete("delete from user where id=#{id}")
  void deleteUser(Integer id);
  /**
   * 查询用户根据ID
   * @param id
   * @return
   */
  @Select("select * from user where id=#{id}")
  @ResultMap(value = {"userMap"})
  User findById(Integer id);
  /**
   * 根据用户名称查询用户
   * @param name
   * @return
   */
//  @Select("select * from user where username like #{name}")
  @Select("select * from user where username like '%${value}%'")
  List<User> findByUserName(String name);
  /**
   * 查询用户数量
   * @return
   */
  @Select("select count(*) from user")
  int findTotalUser();
在findAll()方法中配置@Results的返回值的注解,在@Results注解中使用@Result配置根据用户和账户的关系而添加的属性,User中的属性List<Account>一个用户有多个账户的关系的映射配置:@Result(column = "id",property = "accounts",many = @Many(select = "com.example.dao.AccountDao.findAccountByUid",fetchType = FetchType.LAZY)),使用@Many来向Mybatis表明其一对多的关系,@Many中的select属性对应的AccountDao中的findAccountByUid方法的全限定名,fetchType代表使用立即加载或者延迟加载,因为这里为一对多根据前面的讲解,懒加载的使用方式介绍一对多关系一般使用延迟加载,所以这里配置为LAZY方式。在Account中存在多对一或者一对一关系,所以配置返回值属性时使用:@Result(property = "user",column = "uid",one = @One(select = "com.example.dao.UserDao.findById",fetchType = FetchType.EAGER)),property代表领域类中声明的属性,column代表传入后面select语句中的参数,因为这里为一对一或者说为多对一,所以使用@One注解来描述其关系,EAGER表示使用立即加载的方式,select代表查询本条数据时所用的方法的全限定名,fetchType代表使用立即加载还是延迟加载。
4.Demo中Mybatis的配置
<?xml version="1.0" encoding="UTF-8" ?>
<!DOCTYPE configuration
    PUBLIC "-//mybatis.org//DTD Config 3.0//EN"
    "http://mybatis.org/dtd/mybatis-3-config.dtd">
<configuration>
  <settings>
    <!--<!–开启全局的懒加载–>-->
    <!--<setting name="lazyLoadingEnabled" value="true"/>-->
    <!--<!–关闭立即加载,其实不用配置,默认为false–>-->
    <!--<setting name="aggressiveLazyLoading" value="false"/>-->
    <!--开启Mybatis的sql执行相关信息打印-->
    <setting name="logImpl" value="STDOUT_LOGGING" />
    <!--<setting name="cacheEnabled" value="true"/>-->
  </settings>
  <typeAliases>
    <typeAlias type="com.example.domain.User" alias="user"/>
    <package name="com.example.domain"/>
  </typeAliases>
  <environments default="test">
    <environment id="test">
      <!--配置事务-->
      <transactionManager type="jdbc"></transactionManager>
      <!--配置连接池-->
      <dataSource type="POOLED">
        <property name="driver" value="com.mysql.jdbc.Driver"/>
        <property name="url" value="jdbc:mysql://localhost:3306/test1"/>
        <property name="username" value="root"/>
        <property name="password" value="123456"/>
      </dataSource>
    </environment>
  </environments>
  <mappers>
    <package name="com.example.dao"/>
  </mappers>
</configuration>
主要是记得开启mybatis中sql执行情况的打印,方便我们查看执行情况。
5.测试
(1)测试查询用户同时查询出其账户的信息
测试代码:
public class UserTest {
private InputStream in;
private SqlSessionFactory sqlSessionFactory;
private SqlSession sqlSession;
private UserDao userDao;
@Before
public void init()throws Exception{
in = Resources.getResourceAsStream("SqlMapConfig.xml");
sqlSessionFactory = new SqlSessionFactoryBuilder().build(in);
sqlSession = sqlSessionFactory.openSession();
userDao = sqlSession.getMapper(UserDao.class);
}
@After
public void destory()throws Exception{
sqlSession.commit();
sqlSession.close();
in.close();
}
@Test
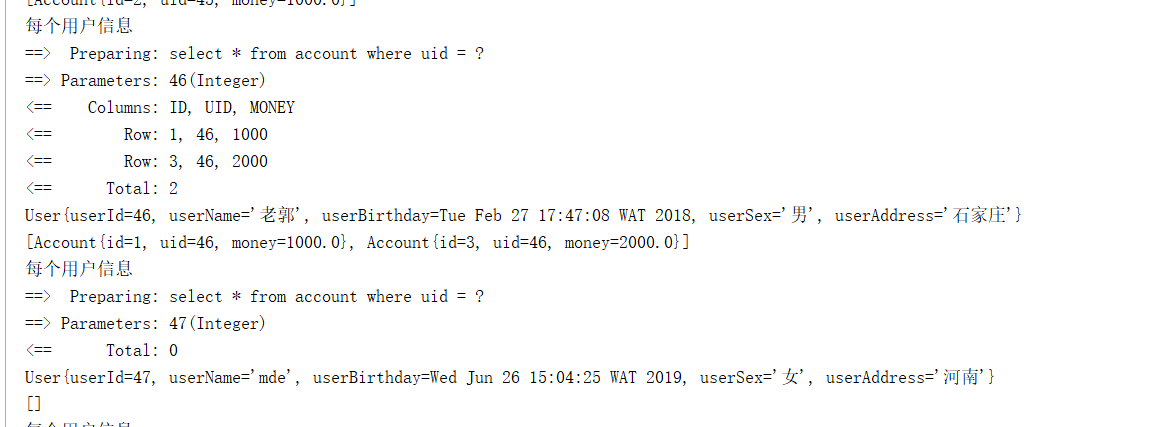
public void testFindAll(){
List<User> userList = userDao.findAll();
for (User user: userList){
System.out.println("每个用户信息");
System.out.println(user);
System.out.println(user.getAccounts());
}
}
测试结果:
(2)查询所有账户信息同时查询出其所属的用户信息
测试代码:
public class AccountTest {
private InputStream in;
private SqlSessionFactory sqlSessionFactory;
private SqlSession sqlSession;
private AccountDao accountDao;
@Before
public void init()throws Exception{
in = Resources.getResourceAsStream("SqlMapConfig.xml");
sqlSessionFactory = new SqlSessionFactoryBuilder().build(in);
sqlSession = sqlSessionFactory.openSession();
accountDao = sqlSession.getMapper(AccountDao.class);
}
@After
public void destory()throws Exception{
sqlSession.commit();
sqlSession.close();
in.close();
}
@Test
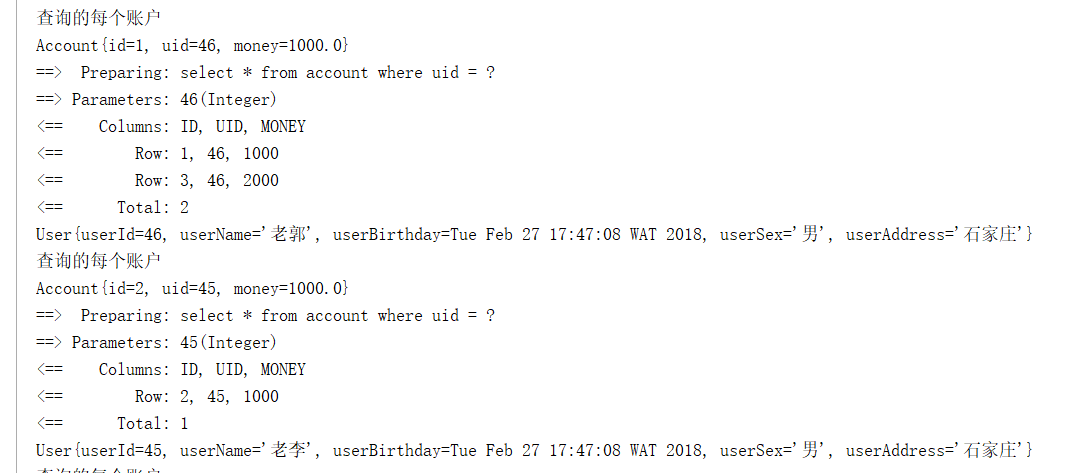
public void testFindAll(){
List<Account> accountList = accountDao.findAll();
for (Account account: accountList){
System.out.println("查询的每个账户");
System.out.println(account);
System.out.println(account.getUser());
}
}
}
测试结果:
总结
以上所述是小编给大家介绍的Mybatis基于注解实现多表查询功能,希望对大家有所帮助,如果大家有任何疑问请给我留言,小编会及时回复大家的。在此也非常感谢大家对谷谷点程序网站的支持!
如果你觉得本文对你有帮助,欢迎转载,烦请注明出处,谢谢!
转载请注明:谷谷点程序 » Mybatis基于注解实现多表查询功能